You can use Azure Point-to-Site (P2S) VPN to connect to your Azure Virtual Network from an individual device. This helps remote workers to access resources inside the VNet. You can use certificates, RADIUS or Azure AD for user authentication.
Azure AD authentication is the most recent and easiest method to configure. With AAD authentication you can leverage additional security features like MFA and Conditional Access. It uses OpenVPN protocol for tunneling. Below is the method to configure P2S VPN using Azure AD.
1. Let's assume you already have a virtual network in Azure (10.10.0.0/16). Create a gateway subnet inside that Azure VNet with subnet mask of /27 or larger (e.g. 10.10.1.0/27). This gateway subnet is used by Azure VPN Gateway.
2. Open Virtual Network Gateways in Azure.

3. Click on Add and create a Virtual Network Gateway.
Select VPN for Gateway type, Route-based for VPN type. Select VpnGw1 or higher SKU. Do not select basic. Enter created Gateway Subnet.
Keep Enable active-active mode and Configure BGP ASN in Disabled state.
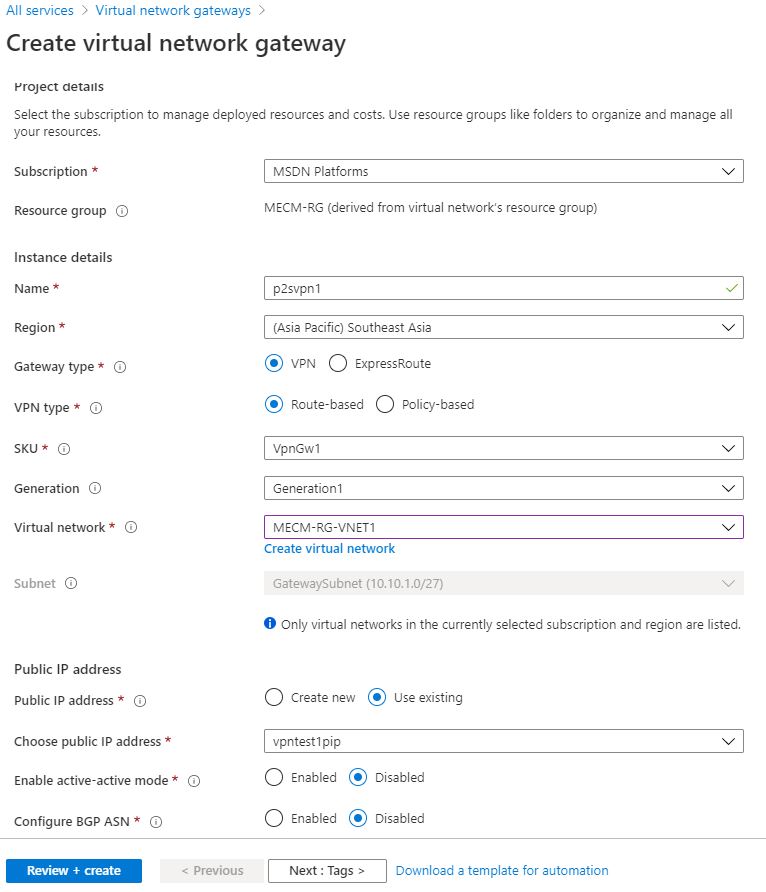
4. Click on Review+Create. If all are correct, click on Create. Deployment will take around 30-45 minutes to complete.
5. Go to following link to give admin consent to Azure VPN app. Copy and paste it to the address bar of the browser. Sign in with an account which has global admin permissions.
This link refers to Azure Public cloud locations. If your deployment location is Azure Government, Microsoft Cloud Germany or Azure China 21Vianet find the appropriate link from Microsoft docs.
https://login.microsoftonline.com/common/oauth2/authorize?client_id=41b23e61-6c1e-4545-b367-cd054e0ed4b4&response_type=code&redirect_uri=https://portal.azure.com&nonce=1234&prompt=admin_consent

6. Once done you can see Azure VPN app listed under Enterprise Applications in Azure AD.

7. While you are in Azure portal open an Azure cloud shell window and sign in.

8. Now enable Azure AD authentication on the VPN gateway by running below 3 PowerShell commands in cloud shell.
Change areas marked in yellow to reflect your own environment. You can find Directory ID in Azure Active Directory > Properties > Directory ID.
$gw = Get-AzVirtualNetworkGateway -Name <name of VPN gateway> -ResourceGroupName <Resource group>
Set-AzVirtualNetworkGateway -VirtualNetworkGateway $gw -VpnClientRootCertificates @()
Set-AzVirtualNetworkGateway -VirtualNetworkGateway $gw -AadTenantUri "https://login.microsoftonline.com/<your Directory ID>/" -AadAudienceId "41b23e61-6c1e-4545-b367-cd054e0ed4b4" -AadIssuerUri "https://sts.windows.net/<your Directory ID>/" -VpnClientAddressPool 192.168.0.0/24 -VpnClientProtocol OpenVPN


9. Create a downloadable VPN profile by running following 2 Powershell commands in same Azure cloud shell window.
$profile = New-AzVpnClientConfiguration -Name <name of VPN gateway> -ResourceGroupName <Resource group> -AuthenticationMethod "EapTls"
$PROFILE.VpnProfileSASUrl

10. Copy and paste the above generated url in browser address bar and download the VPN profile. You can verify configuration details by checking point-to-site configuration in VPN gateway settings.

11. Extract the downloaded vpnclientconfiguration zip file. You can see two folders; AzureVPN and Generic.
There is a file named azurevpnconfig.xml inside AzureVPN folder. That is the configuration profile for Azure VPN client. you can edit the xml file to add DNS suffixes, DNS servers or routes. Share it to users to configure VPN profile in their devices.


12. Download Azure VPN Client to user device from Microsoft store.

13. Open Azure VPN Client and click import.

14. Locate the azurevpnconfig.xml file and click open. Verify the details. You can see Azure Active Directory selected for Authentication Type.
Rename Connection Name if wanted and click save.

15. Now you can see the the added VPN connection in left connections pane.

16. Click on Connect. A sign in window will pop up. Enter your Azure AD credentials and sign in. If all good, status will change to Connected.


17. You can verify connectivity by pinging to a private IP of a Azure VM.
No comments:
Post a Comment